Replacing my Teclast X98 Air 3G damaged LCD Panel.
This is a follow up post for my Teclast X98 air 3G battery repair post. You can check out that post here. Damaging a perfectly fine LCD panel while replacing a battery that cost a lot less …..how dumb is that… :(
Before I decided to go forward in replacing the LCD panel, I did some digging on the internet but I could not find much information on the internet regarding replacement of the LCD panel for this particular tablet.
After searching around for the replacement LCD panel cost and comparing the cost of getting a new tablet of a similar size, I concluded that it is more economical to take the risk to repair the tablet.
Here’s the LCD panel that I bought online from taobao. You can also get them from Aliexpress. The part number for this LCD is LP097QX2. You can search using this part number.
This is the rear:
Yes, there are a lot of finger prints on the back panel. This is how I received it. It is wrapped in layers of foam but the panel is not even placed in an ESD bag. I wonder what was the selling thinking..

This is the front:
Yes, there are also lots of finger prints on the LCD panel.
I did try to clean it up with some 3M LCD screen cleaning solution, which I managed to remove most of the finger prints.

Before I proceed to perform the repair, I did a quick LCD test by looking for the LCD output connector on the motherboard and plugging it in. My LCD worked fine.

On with the repair………..
So, in this post, I will share what and how I replace the damaged LCD panel on my X98. With this information, you can then judge for yourself whether is it worth the hassle to perform the repair.
For any repairs, you will need to have some tools to pry open the rear cover. These are the main tools that I used. You can use whatever similar tools that you have on hand.

Here’s some links where you can find equal or similar tools that I use.
1. A small Philips screwdriver (about 1.5mm)(those small jeweler’s Philips head screwdriver will do just fine). I use one that is similar to this set or this set.
2. An angled tweezer. (get one from Aliexpress/Amazon)
3. Optional: a pair of long nose pliers.
4. Optional: Spudger. (get one from Aliexpress/Amazon).
3. Optional: a pair of long nose pliers.
4. Optional: Spudger. (get one from Aliexpress/Amazon).
To open the rear cover, wedge the pry tool in between the gap of the front bezel and the rear cover. It is best to start from the the bottom of the tablet and slowly work your way to the top of the tablet.

After opening up the tablet, you will see something like this. The battery looks a little different on my tablet because I just had it replaced.

The first thing that I did was to remove the battery power. This is easily accomplished by de-soldering the “Bat +” cable from motherboard.

Next, tape over the exposed “Bat +” cable with some insulating tape. I used kapton tape to insulate the exposed wire. This is to prevent the expose cable from touching something and causing a short.
If you are interested, you can get some kapton tape from Amazon .

I later discovered that removing the battery completely will make things easier for me and I went ahead to de-soldered all the battery connections.

The next step is to remove all the adhesive tape on the top left corner. This will reveal the multiple flex cable connection that needs to be disconnected in order to lift the motherboard and LCD panel off the tablet bezel. Remember to keep the adhesive tape as you will need to paste them back onto the tablet. Try not to touch the adhesive part of the tape as doing so might contaminate the adhesive and the strength will be reduced.

To remove the flex cable from the connector, unlatch the lock by flipping it upwards.

After the flex cables are disconnected from the motherboard, its time to remove the speaker.
The speaker are secured using double-side tape. Slowly and carefully lift up the speaker. Be very careful not to bend the speaker when pulling it off tablet. Use whatever tools to make it easier for you.

The next step is to unscrew the motherboard from the tablet. There are only 2 screws that is holding down the motherboard. Do also take note of the mic. Loosen the mic from its slot.

With the screws removed, speakers and mic loosen, flip the everything over to the left side of the tablet.

Its time to remove the LCD panel. At this point, make sure the surrounding area on the table are as dust free as possible. You do not want dust to fall onto the digitizer after you lift the faulty LCD off the tablet bezel.
However, at this point, I noticed an aluminum adhesive sheet pasted on the LCD.

I’m not sure if it is something that I can do without, so I just rip it out and transfer on to the new LCD.

Remove these screws to take out the LCD panel. Do note that the tiny screws are self-taping screws and the screw depth are very shallow. Do not put too much torque when screwing it down.

Quick tip: you can tape down the flingy flex cable to prevent them from landing on the digitizer after the LCD panel is removed. If you have a blower, you can give the digitizer a quick blow to remove any light dust. However, if you do not have a blower, DO NOT BLOW through your mouth…..bad idea. DO NOT touch the digitizer surface with your fingers too.

Clean the replacement LCD panel and make sure the LCD is dust and finger prints free. If they are pristine, go ahead and place the new LCD panel onto the tablet. Make sure you align the corner mounting guide on the tablet slowly. There might be some slight tolerance issue between the LCD panel and the tablet. Slowly try to make adjustments to ensure they fit. Do not force the LCD panel down.
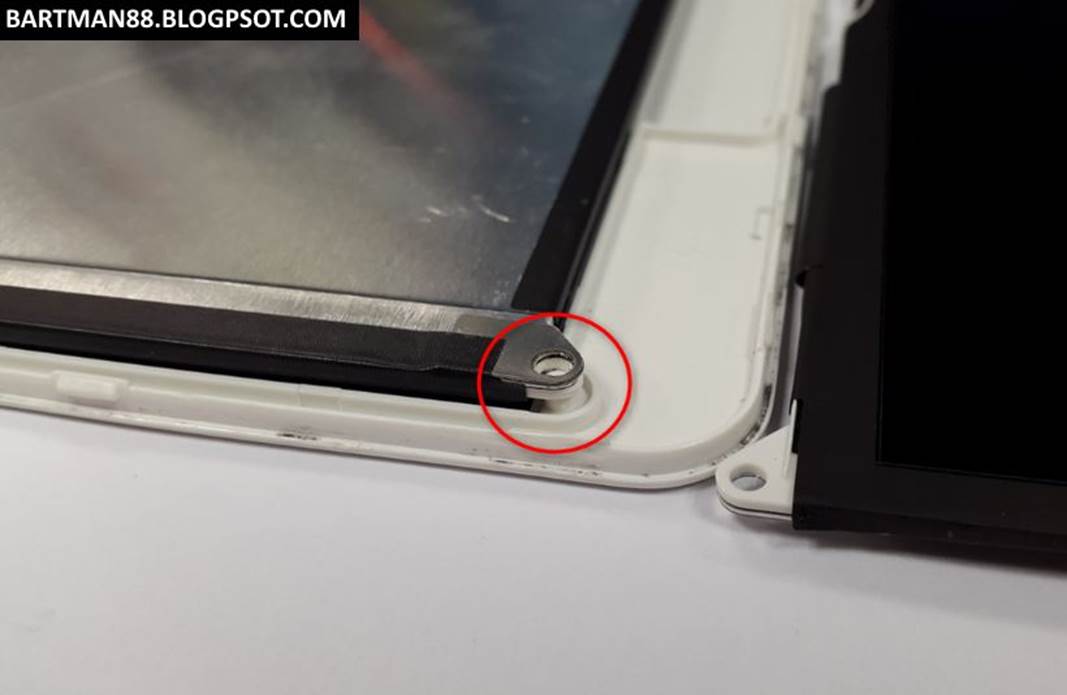
Make sure all the four corners of the LCD are fully seated like so.

Paste the aluminum sheet onto the LCD panel if you earlier decided to reuse this. Screw in the rest of the items like motherboard, speaker, mic and reattach all the flex cables. Paste all the original adhesive tape onto the flex cable.

Time to re-install the battery. I apply very minimal double sided tape onto the battery just in case I need to remove them again later down the road.
Solder the battery wires to the motherboard after pasting down the battery.

I have added some additional kapton tape to certain areas that I felt might need more support.

The final power on is good.
Now to install the rear cover.
Quick tip: Tape the buttons to the rear case like so, to hold it in place while you snap the rear cover onto the tablet.

FINALLY!!!! All fixed.

Hope this is able to help someone out there.
Comments
Post a Comment